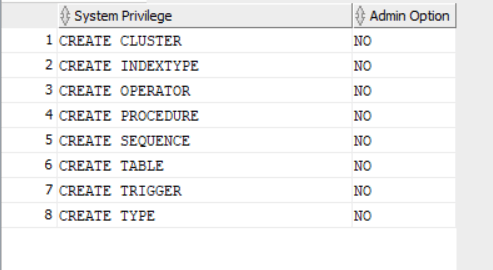
RESOURCE role is a popular and famous built-in database role, historically its used to be granted to developers to enable them create objects in their working schema.
The built-in role has changed in the number of system privileges, to clarify more in 19c it consists of 8 system privileges:
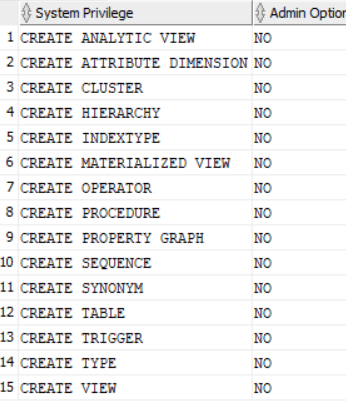
In 26ai, more system privileges were added such as “create view” system privilege, total number is 15:
This is a good enhancement and much needed in 26ai release, it enables more empowerment for the developers ,and maintains the security through least privilege principle.
In Oracle Multitenant architecture which was initially introduced in Oracle 12CR1, the security isolation between PDB’s is an important aspect to ensure in a cloud multi-hosting environment multiple customers data are protected from any unauthorized access or any type of security breach.
Two main methods to maintain isolation among PDB’s in your CDB container: PATH_PREFIX , and Lockdown Profiles.
PATH_PREFIX is a parameter you specify while creating the pluggable database to limit operating system file system exposure at the pluggable database level, so you can only access and create directories within the specified value. However, this has shortcomings because PATH_PREFIX can only be specified/defined while the database is being created in the SQL statement clause. The SQL statement will look like the following:
CREATE PLUGGABLE DATABASE sales_pdb ADMIN USER sales_admin IDENTIFIED BY “YourPassword123” ROLES = (PDB_DBA) FILE_NAME_CONVERT = (‘/u01/app/oracle/oradata/CDB1/pdbseed/’, ‘/u01/app/oracle/oradata/CDB1/sales_pdb/’) PATH_PREFIX = ‘/u01/app/oracle/oradata/CDB1/sales_pdb/storage/’;
You can’t set it later on….in the past the only solution was to drop and re-create the database with this parameter being specified in the create pluggable database statement.
This is changed starting with Oracle 19.30 RU, a new parameter was introduced “DIRECTORY_PREFIXES_ALLOWED”
You set this parameter at CDB level , and it will restrict access and directory creation.
Let me simulate it in 19.31 [April 2026 release update]:
sqlplus / as sysdba
SQL> ALTER SYSTEM SET DIRECTORY_PREFIXES_ALLOWED=’/opt/tmp’;
System altered.
// There is no database instance restart is required
Now, to test it….as SYS account I will access pluggable database ORCLPDB1
SQL> alter session set container=ORCLPDB1;
Session altered.
SQL> create or replace directory testing as ‘/opt/oracle/product/19c/dbhome_1/’; create or replace directory testing as ‘/opt/oracle/product/19c/dbhome_1/’ * ERROR at line 1: ORA-65254: invalid path specified for the directory
// it failed as shown above
SQL> create or replace directory testing as ‘/opt/tmp/t2’;
Directory created.
// it will succeed if the directory referenced on the same path as defined in the parameter
In Oracle 26ai There are two types of indexes when dealing with vector data:
IVF Inverted File Flat it’s a disk based index
Hierarchical Navigable Small World (HNSW) index an in-memory based index
Let us first explore IVF index:
I will create a dummy table called galaxies and insert some data:
sqlplus vector_user/vectorai@FREEPDB1
create table galaxies (id number, name varchar2(50), doc varchar2(500), embedding vector);
insert into galaxies (id, name,doc, embedding)
select 1,’M31′,’Messier 31 is a barred spiral galaxy in the Andromeda constellation which has a lot of barred spiral galaxies’,TO_VECTOR(VECTOR_EMBEDDING(doc_model USING ‘Messier 31 is a barred spiral galaxy in the Andromeda constellation which has a lot of barred spiral galaxies’ as data));
commit;
insert into galaxies (id, name,doc, embedding)
select 2,’M33′,’Messier 33 is a spiral galaxy in the Triangulum constellation’,TO_VECTOR(VECTOR_EMBEDDING(doc_model USING ‘Messier 33 is a spiral galaxy in the Triangulum constellation’ as data));
commit;
insert into galaxies (id, name,doc, embedding)
select 3,’M58′,’Messier 58 is an intermediate barred spiral galaxy in the Virgo constellation’,TO_VECTOR(VECTOR_EMBEDDING(doc_model USING ‘Messier 58 is an intermediate barred spiral galaxy in the Virgo constellation’ as data));
commit;
insert into galaxies (id, name,doc, embedding)
select 4,’M63′,’Messier 63 is a spiral galaxy in the Canes Venatici constellation’,TO_VECTOR(VECTOR_EMBEDDING(doc_model USING ‘Messier 63 is a spiral galaxy in the Canes Venatici constellation’ as data));
commit;
insert into galaxies (id, name,doc, embedding)
select 5,’M77′,’Messier 77 is a barred spiral galaxy in the Cetus constellation’,TO_VECTOR(VECTOR_EMBEDDING(doc_model USING ‘Messier 77 is a barred spiral galaxy in the Cetus constellation’ as data));
commit;
insert into galaxies (id, name,doc, embedding)
select 6,’M91′,’Messier 91 is a barred spiral galaxy in the Coma Berenices constellation’,TO_VECTOR(VECTOR_EMBEDDING(doc_model USING ‘Messier 91 is a barred spiral galaxy in the Coma Berenices constellation’ as data));
commit;
insert into galaxies (id, name,doc, embedding)
select 7,’M49′,’Messier 49 is a giant elliptical galaxy in the Virgo constellation’,TO_VECTOR(VECTOR_EMBEDDING(doc_model USING ‘Messier 49 is a giant elliptical galaxy in the Virgo constellation’ as data));
commit;
insert into galaxies (id, name,doc, embedding)
select 8,’M60′,’Messier 60 is an elliptical galaxy in the Virgo constellation’,TO_VECTOR(VECTOR_EMBEDDING(doc_model USING ‘Messier 60 is an elliptical galaxy in the Virgo constellation’ as data));
commit;
insert into galaxies (id, name,doc, embedding)
select 9,’NGC1073′,’NGC 1073 is a barred spiral galaxy in Cetus constellation’,TO_VECTOR(VECTOR_EMBEDDING(doc_model USING ‘NGC 1073 is a barred spiral galaxy in Cetus constellation’ as data));
commit;
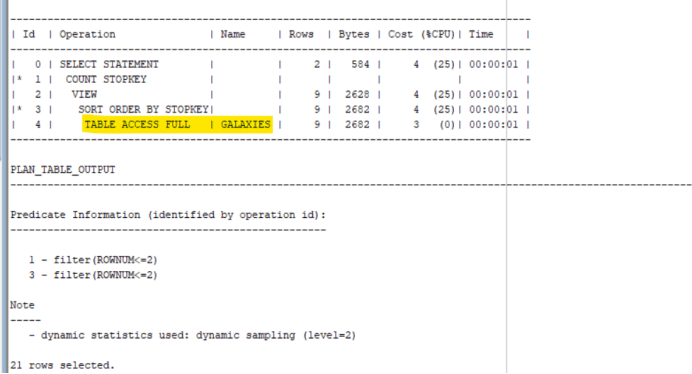
Then, let us run explain plan against a SELECT Query as shown below:
explain plan for select id, name,DOC
from galaxies
order by vector_distance(embedding, TO_VECTOR(VECTOR_EMBEDDING(doc_model USING ‘Vigro’ as data)), COSINE)
fetch approx first 2 rows only;
select * from table(dbms_xplan.display);
A Full table scan has occurred as shown below:
// don’t execute the following command in production environment as it clears out data from memory !!
SQL> alter system FLUSH BUFFER_CACHE;
// run the following query to check performance without index:
SQL> set timing on
SQL> select id, name,DOC
from galaxies
order by vector_distance(embedding, TO_VECTOR(VECTOR_EMBEDDING(doc_model USING ‘Vigro’ as data)), COSINE)
fetch approx first 2 rows only;
The execution time was 240 millisecond
Will create an index:
SQL> CREATE VECTOR INDEX galaxies_ivf_idx ON galaxies (embedding) ORGANIZATION NEIGHBOR PARTITIONS
DISTANCE COSINE
WITH TARGET ACCURACY 95;
// don’t execute the following command in production environment as it clears out data from memory !!
SQL> alter system FLUSH BUFFER_CACHE;
SQL> alter system flush shared_pool;
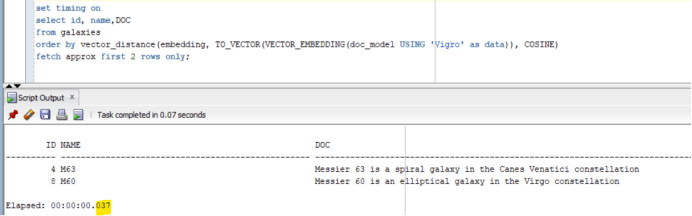
// checking the run time of the SELECT statement after adding an index:
SQL> set timing on
SQL> select id, name,DOC
from galaxies
order by vector_distance(embedding, TO_VECTOR(VECTOR_EMBEDDING(doc_model USING ‘Vigro’ as data)), COSINE)
fetch approx first 2 rows only;
The execution time was 37 milliseconds
So, indexes are very important when dealing with vector data in your Oracle database system.
Oracle Database patches are primarily released as quarterly Release Updates (RUs) in every quarter during the year, however oracle releases post-patches called MRPs that fix some bugs that appears after the base patches (on top of RU’s).
Unfortunately, you can’t view/list the installed patches (MRPs) on your Oracle database binaries using OPatch utility, instead you will need to use AHF (Autonomous Health Framework).
Oracle Autonomous Health Framework (AHF) is a free, integrated suite of tools that autonomously monitors, diagnoses, and resolves potential availability and performance issues in Oracle Database systems. And, it get released on regular basis…so you will need to download the latest version.
The following command will list MRP’s installed on your Oracle database binaries:
In Oracle database system, a “schema” account is actually a user and this user will be associated with a dedicated tablespace where database objects will be stored in. Having said that…there is a SQL command in Oracle called “create schema” but it actually doesn’t create the schema account (user)….it creates the objects and permissions associated with it.
Let us me first demonstrate how to create a schema account:
Will first create a tablespace and will call it “TS_HR” in pluggable database FREEPDB1:
Database table called “dept” created under HR schema and granted permission to pre-exisiting HR_APP account as shown above.
Important remark: oracle introduced “schema only” account concept which will prevent the account/user from being directly authenticated and can be accessed through proxy setup.
SQL> exec DBMS_STATS.FLUSH_DATABASE_MONITORING_INFO; BEGIN DBMS_STATS.FLUSH_DATABASE_MONITORING_INFO; END;
* ERROR at line 1: ORA-00600: internal error code, arguments: [qosdExpStatRead: expcnt mismatch], [65562], [26], [1144616], [1], [], [], [], [], [], [], [] ORA-06512: at “SYS.DBMS_STATS”, line 2141 ORA-06512: at “SYS.DBMS_STATS”, line 43486 ORA-06512: at line 1
Oracle database export datapump fails with below errors:
DDE: Problem Key ‘ORA 600 [qosdExpStatRead: expcnt mismatch]’ was flood controlled (0x4) (incident: 2017148) ORA-00600: internal error code, arguments: [qosdExpStatRead: expcnt mismatch], [65562], [26], [1144616], [1], [], [], [], [], [], [], [] 2025-07-29T11:33:58.617971+03:00 Incident 2017643 created, dump file: /oraclex/oradbp25/diag/rdbms/oradbp25/oradbp25/incident/incdir_2017643/oradbp25_dw00_3988067_i2017643.trc ORA-00600: internal error code, arguments: [qosdExpStatRead: expcnt mismatch], [65562], [26], [1144616], [1], [], [], [], [], [], [], [] ORA-06512: at “SYS.DBMS_STATS”, line 2141 ORA-06512: at “SYS.DBMS_STATS”, line 57633 ORA-06512: at “SYS.DBMS_STATS”, line 57866 ORA-06512: at “SYS.KUPW$WORKER”, line 30029 ORA-06512: at “SYS.KUPW$WORKER”, line 3503 ORA-06512: at “SYS.KUPW$WORKER”, line 13746 ORA-06512: at “SYS.KUPW$WORKER”, line 2439 ORA-06512: at line 2
SOLUTION/FIX:
SQL> alter system set “_fix_control”=’31143146:on’,’32005394:on’ scope=both;
of course, its highly recommended to open a case with ORACLE.
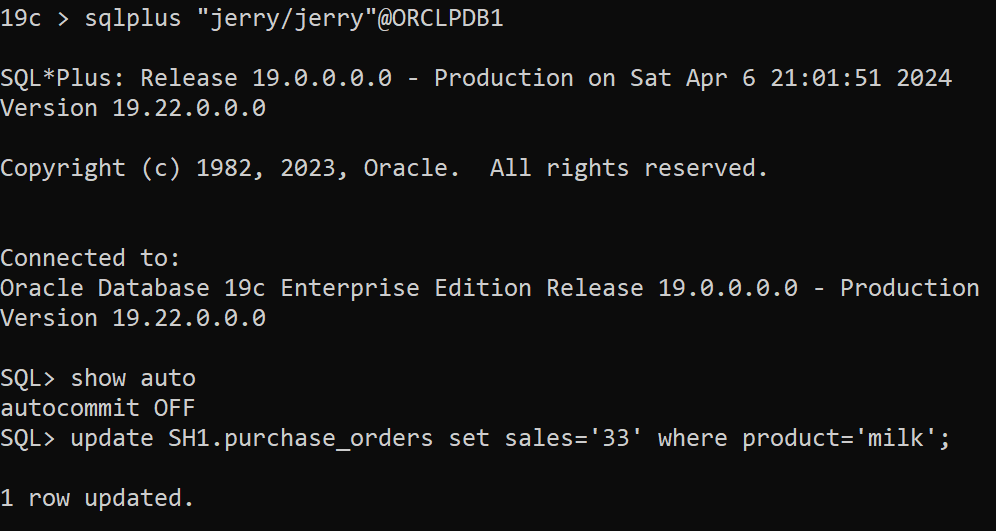
To illustrate and simulate locking and blocking let me first prepare a dummy table and two database accounts for simulation:
create table SH1.purchase_orders ( product varchar2(20), sales number (5));
SQL> insert into SH1.purchase_orders values (‘milk’, 20);
SQL> insert into SH1.purchase_orders values (‘corn_flakes’, 40);
SQL> insert into SH1.purchase_orders values (‘cheese’, 16);
SQL> create user jerry identified by jerry;
SQL> grant create session to jerry;
SQL> grant select,update on SH1.purchase_orders to jerry;
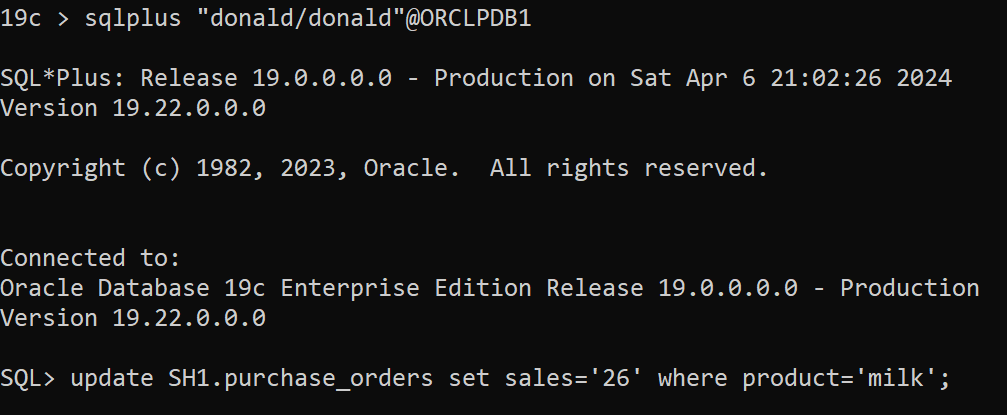
SQL> create user donald identified by donald;
SQL> grant create session to donald;
SQL> grant select,update on SH1.purchase_orders to donald;
// as shown below both max_idle_time, max_idle_blocker_time are set to “0” which means unlimited
SQL> show parameter idle
NAME TYPE VALUE
———————————— ———– ——————————
max_idle_blocker_time integer 0
max_idle_time integer 0
In the first session as user jerry and auto-commit is to “FALSE” as shown below so you will need to explicitly end the transaction either by “commit” or “rollback”:
In the second session as user donald [ donald session is hanging because there is already shared row lock on the table]
To find blocking session:
SQL> select * from v$lock where block >0;
SQL> select SID,USERNAME,STATUS,PROGRAM from v$session where SID=290;
To find locking:
SQL> select * from V$SESSION_EVENT where WAIT_CLASS=’Application’ and EVENT like ‘enq: TX – row lock contention’;
SID 283 is for account “donald”
So, based on the above scenario lock/block will remain unless jerry’s session commit or rollback.
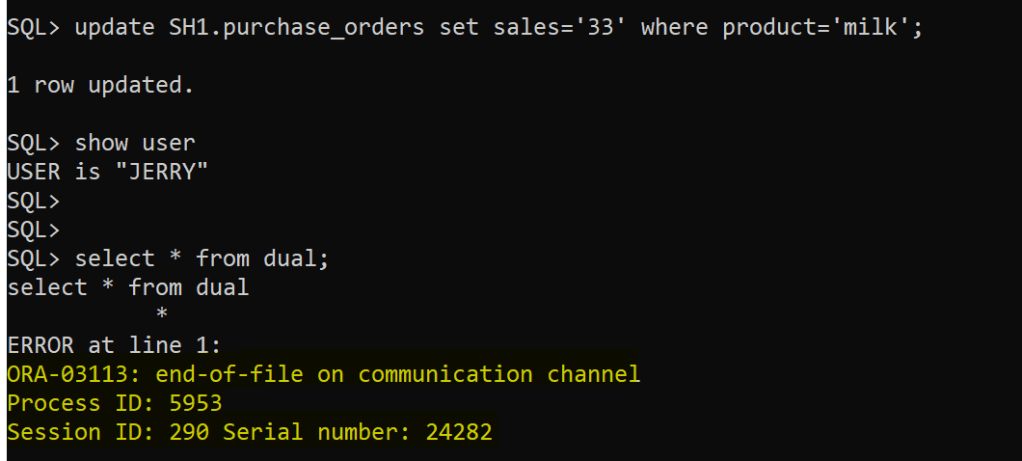
Let us now explore max_idle_blocker_time parameter and set to 1 minute at the pluggable database level:
sqlplus / as sysdba
SQL> alter session set container=ORCLPDB1;
Session altered.
SQL> alter system set max_idle_blocker_time=1;
System altered.
SQL> show parameter idle
NAME TYPE VALUE
———————————— ———– ——————————
max_idle_blocker_time integer 1
max_idle_time integer 0
Repeat the scenario again….
After 1 minute in jerry’s session:
The session is terminated as expected after 1 minute
And, blocking disappears however locking from “donald” session will remain so it will require either “commit” or “rollback” for the transaction being executed.
A very interesting case I have faced in an Oracle database environment patched with 19.27 RU, I tried dropping an AWR snapshot and it failed as shown below:
ERROR at line 1: ORA-13516: AWR Operation failed: AWR Schema is unavailable due maintenance ORA-06512: at “SYS.DBMS_WORKLOAD_REPOSITORY”, line 193 ORA-06512: at line 2
Solution:
Its unfortunately a bug !
// Index WRH$_SGASTAT_U in “WRH$_SGASTAT” table was in UNUSABLE state:
select * from dba_indexes where index_name=’WRH$_SGASTAT_U’;
// Drop the constraint: alter table wrh$_sgastat drop constraint wrh$_sgastat_u;
// Turn off partition check:
alter session set events ‘14524 trace name context forever, level 1’;
// Add the constraint back: alter table wrh$_sgastat add constraint wrh$_sgastat_u unique (dbid, snap_id, instance_number, name, pool, con_dbid, stattype) using index local tablespace SYSAUX;
// Turn on partition check: alter session set events ‘14524 trace name context off’;
Then, Try dropping the AWR Snapshot again….should work.
Oracle has just released their quarterly Oracle database security patches (july 2025). This quarter 6 security vulnerabilities were patched and new features and enhancements were introduced.
Lately (for the last few quarters) Oracle has introduced many good and new features in 19c [ so far the long term release] !
After Applying 19.28 RU a new set of system parameter were introduced:
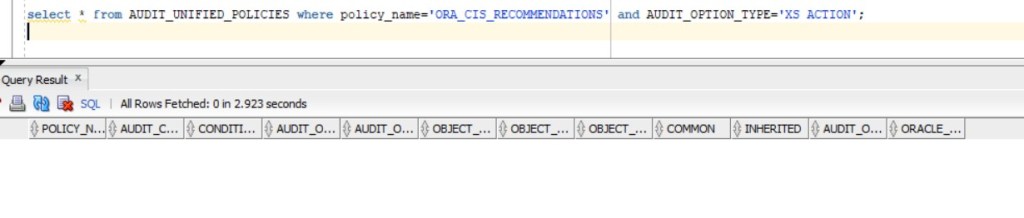
Another new enhancement is in Unified Auditing where a set of “Real Application Security” Audit actions were added to multiple pre-configured audit policies such as ORA_CIS_RECOMMENDATIONS
in 19.27 :
select * from AUDIT_UNIFIED_POLICIES where policy_name=’ORA_CIS_RECOMMENDATIONS’ and AUDIT_OPTION_TYPE=’XS ACTION’;
in 19.28:
select * from AUDIT_UNIFIED_POLICIES where policy_name=’ORA_CIS_RECOMMENDATIONS’ and AUDIT_OPTION_TYPE=’XS ACTION’;