The following are simple steps (guide) to create your first Oracle Cloud ATP:

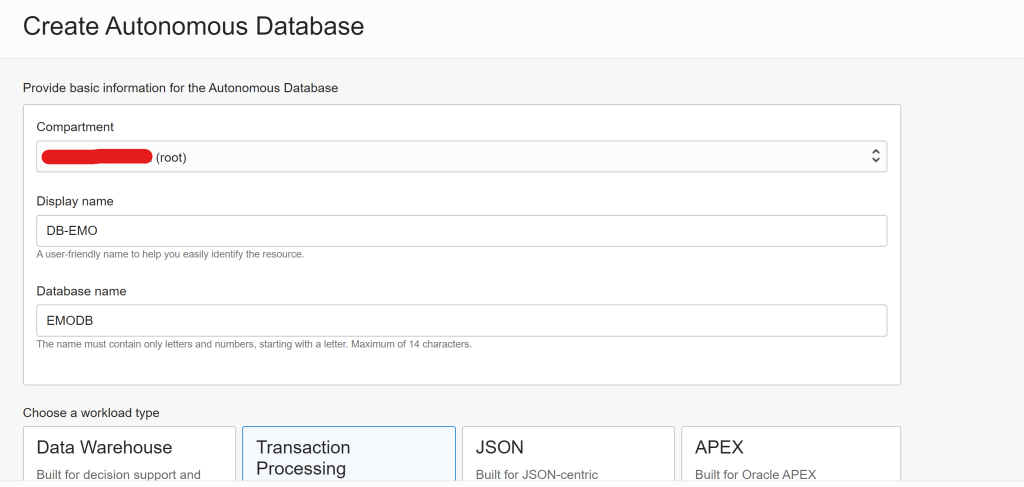
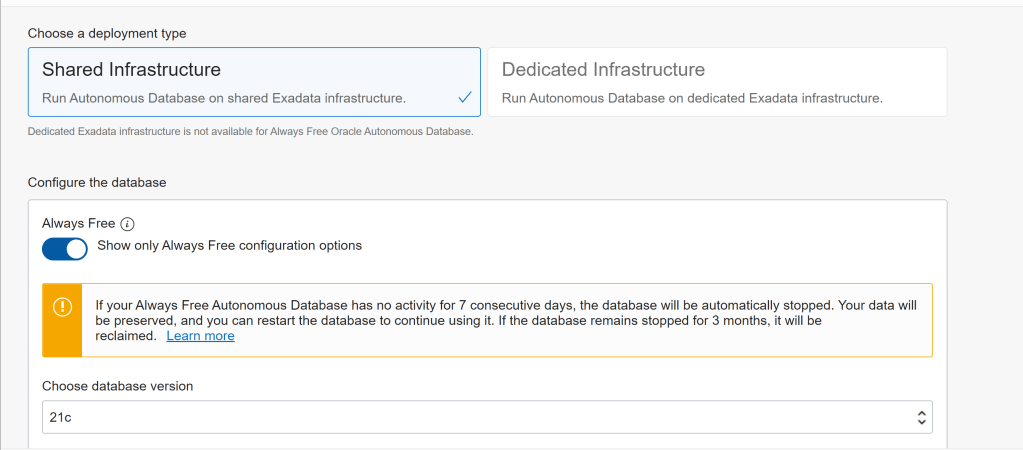
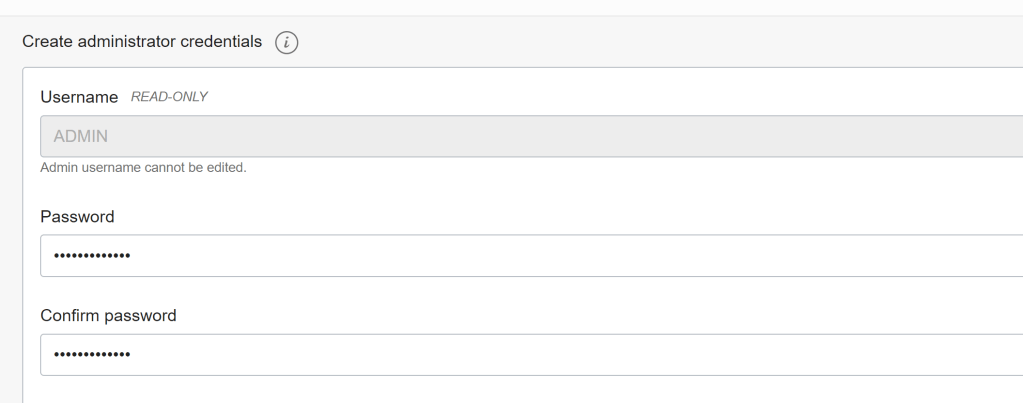
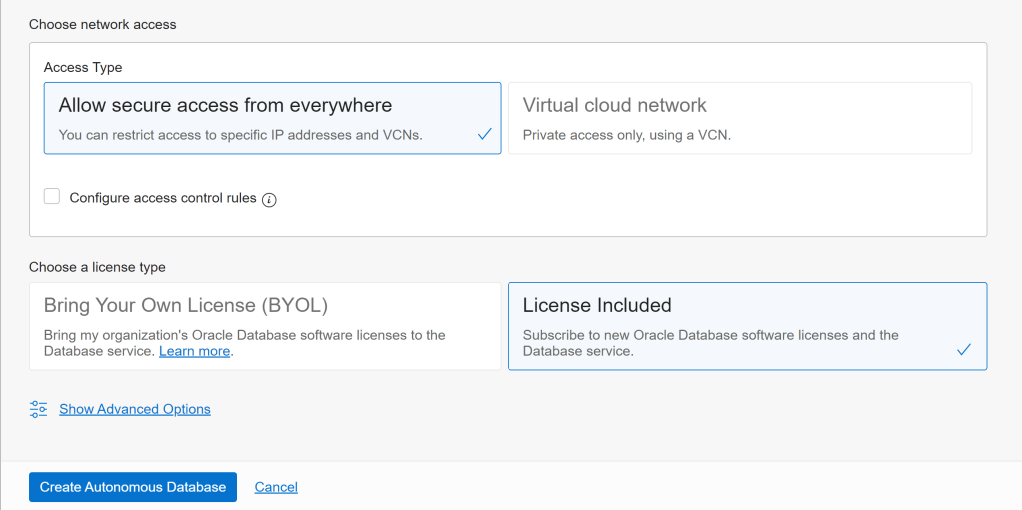

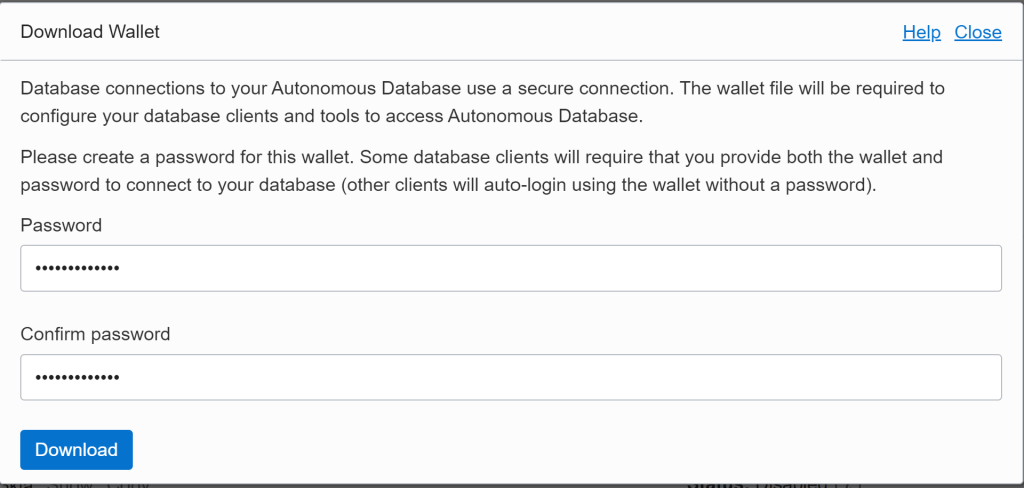
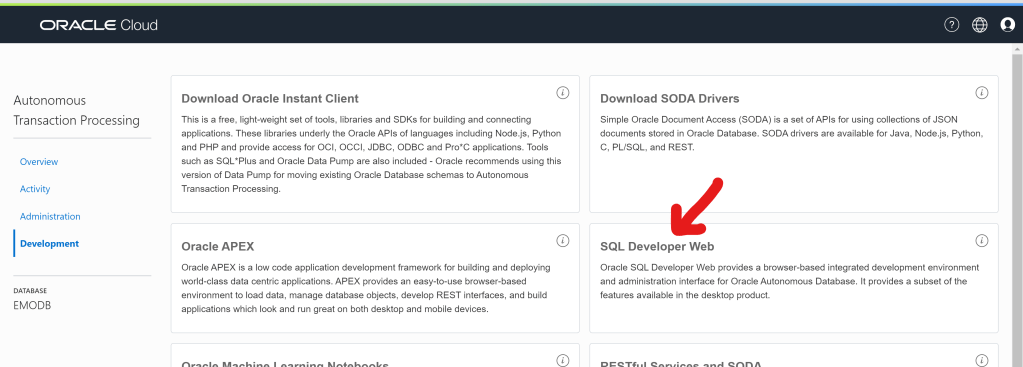
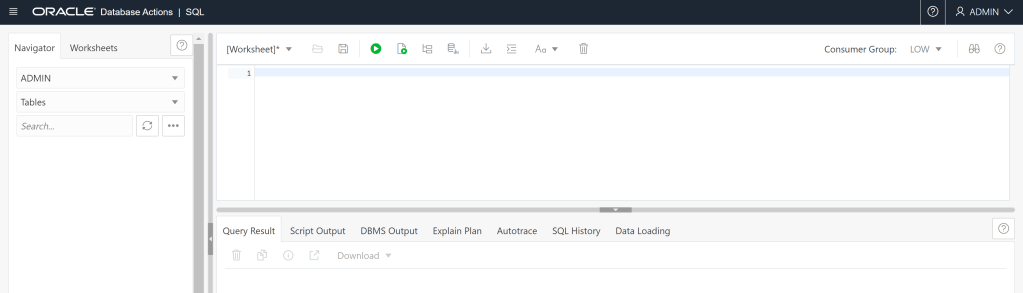

The following are simple steps (guide) to create your first Oracle Cloud ATP:
Here I am going to show three scenarios to illustrate when datapatch utility is required to be executed.
In my simulation the source CDB environment version is 19.3 , the destination CDB environment is 19.9 (patched with October 2020 RU).
Scenario 1: moving PDB from a lower version (source CDB) to a higher destination CDB
SQL> ALTER SESSION SET CONTAINER=CDB$ROOT;
SQL> ALTER PLUGGABLE DATABASE PDB2 CLOSE;
SQL> ALTER PLUGGABLE DATABASE PDB2 UNPLUG INTO ‘D:\19c_vm\OracleDatabase\19.3.0\PDB2_UNLPLUG.xml’;
Then I will drop the database from the source CDB:
SQL> DROP PLUGGABLE DATABASE PDB2;
After that copy the datafiles and .XML file to the destination server hosting the destination CDB:
SQL> CREATE PLUGGABLE DATABASE NEW_PDB
USING ‘/opt/oracle/product/19c/dbhome_1/dbs/PDB2_UNLPLUG.xml’ MOVE
SOURCE_FILE_NAME_CONVERT= (‘D:\19C_BASE\ORADATA\ORACLE19C\PDB2\’, ‘/opt/oracle/oradata/ORCLCDB/NEW_PDB/’);
// open the database and check the dictionary:
alter pluggable database NEW_PDB open;
alter session set container=NEW_PDB;
select * from dba_registry_sqlpatch;
There are NO rows resulted from dba_registry_sqlpatch , this means we will need to run datapatch to update the dictionary of the newly plugged database (always download the latest OPatch utility version):
cd $ORACLE_HOME/OPatch
[oracle@oracle-19c]$ ./datapatch -verbose
SQL Patching tool version 19.9.0.0.0 Production on Mon Nov 30 15:40:32 2020
Copyright (c) 2012, 2020, Oracle. All rights reserved.
Log file for this invocation: /opt/oracle/cfgtoollogs/sqlpatch/sqlpatch_9900_2020_11_30_15_40_32/sqlpatch_invocation.log
Connecting to database…OK
Gathering database info…done
Note: Datapatch will only apply or rollback SQL fixes for PDBs
that are in an open state, no patches will be applied to closed PDBs.
Please refer to Note: Datapatch: Database 12c Post Patch SQL Automation
(Doc ID 1585822.1)
Bootstrapping registry and package to current versions…done
Determining current state…done
Current state of interim SQL patches:
Interim patch 31668882 (OJVM RELEASE UPDATE: 19.9.0.0.201020 (31668882)):
Binary registry: Installed
PDB CDB$ROOT: Applied successfully on 06-NOV-20 08.17.57.037468 PM
PDB NEW_PDB: Not installed
PDB PDB$SEED: Applied successfully on 06-NOV-20 08.17.58.718557 PM
PDB PDB1: Applied successfully on 06-NOV-20 08.18.00.702663 PM
PDB PDB2: Applied successfully on 06-NOV-20 08.18.02.342712 PM
Current state of release update SQL patches:
Binary registry:
19.9.0.0.0 Release_Update 200930183249: Installed
PDB CDB$ROOT:
Applied 19.9.0.0.0 Release_Update 200930183249 successfully on 06-NOV-20 08.59.54.481954 PM
PDB NEW_PDB:
No release update patches installed
After that check dba_registry_sqlpatch view ……the metadata is updated reflecting the patch version and SQL code modifications.
Scenario 2: creating a new pluggable database in a patched CDB
SQL> CREATE PLUGGABLE DATABASE “PDB33” ADMIN USER “admin” IDENTIFIED BY “admin_123”
FILE_NAME_CONVERT=( ‘/opt/oracle/oradata/ORCLCDB/’, ‘/opt/oracle/oradata/ORCLCDB/PDB33/’ )
STORAGE UNLIMITED TEMPFILE REUSE;

So, NO need to run datapatch for any “newly” created PDB in CDB container !
The pluggable database created is based on the template database PDB$SEED
Scenario 3: migrating a PDB to a lower version CDB
ALTER SESSION SET CONTAINER=CDB$ROOT;
ALTER PLUGGABLE DATABASE NEW_PDB CLOSE;
ALTER PLUGGABLE DATABASE NEW_PDB UNPLUG INTO ‘/vagrant/NEW_PDB_UNLPLUG.xml’;
Then I will drop the database from the source CDB:
DROP PLUGGABLE DATABASE NEW_PDB;
// I will plug the database now in the destination CDB
alter session set container=CDB$ROOT;
CREATE PLUGGABLE DATABASE NEW_PDB
USING ‘D:\19c_base\oradata\ORACLE19C\NEW_PDB\NEW_PDB_UNLPLUG.xml’ MOVE
SOURCE_FILE_NAME_CONVERT= (‘/opt/oracle/oradata/ORCLCDB/ORCLCDB/1D59E472CA974170BFC1A471E133E3C9/datafile/’, ‘D:\19c_base\oradata\ORACLE19C\NEW_PDB\’);
After successfully plugging the database….now checking the registry:
alter session set container=NEW_PDB;
select PATCH_ID,DESCRIPTION from dba_registry_sqlpatch;
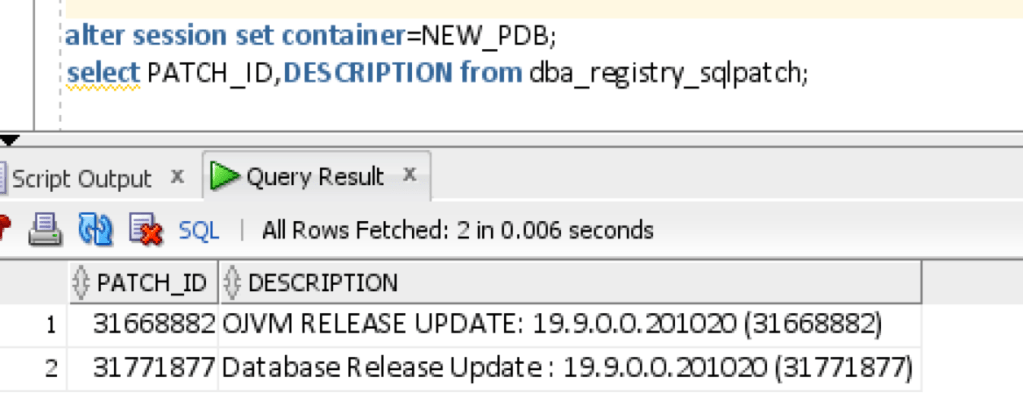
Dictionary is reflecting that the PDB is patched with 19.9 patches
What will happen if I run “datapatch -verbose” command ?

The patches will be rolled back (as expected) !
The datapatch perl script executes the package DBMS_QOPATCH that compares the patch level between the binaries and the database system metadata.
select action,action_time,description from dba_registry_sqlpatch;

Oracle 19c has introduced new feature (capability) which is generating ADDM report from a PDB-level, this was not possible in previous releases, as ADDM was generated from a CDB (Container Level).
The following are the steps to enable ADDM in a PDB:
SQL> alter session set container=PDB1;
Session altered.
SQL> ALTER SYSTEM SET AWR_PDB_AUTOFLUSH_ENABLED=TRUE;
System altered.
//configure snapshot interval for AWR
SQL> EXEC dbms_workload_repository.modify_snapshot_settings(interval=>60);
PL/SQL procedure successfully completed.
// take manual snapshot
SQL> BEGIN
DBMS_WORKLOAD_REPOSITORY.CREATE_SNAPSHOT();
END;
/
// to check snapshsot details for PDB1 database
SQL> select * from DBA_HIST_SNAPSHOT where CON_ID=3;
As HR user I will create a new table and insert dummy data:
sqlplus hr/hr_123@PDB1
CREATE TABLE DUMMY_SEPT (sales number(10));
BEGIN
FOR v_LoopCounter IN 1..3000 LOOP
insert into DUMMY_SEPT values (‘4000’);
COMMIT;
END LOOP;
END;
/
commit;
select * from DUMMY_SEPT;
// as SYS or SYSTEM account execute the following to take manual snapshot:
SQL> BEGIN
DBMS_WORKLOAD_REPOSITORY.CREATE_SNAPSHOT();
END;
/
Now, I will generate ADDM Report for PDB1 database:
SQL> alter session set container=PDB1;
Session altered.
SQL> @?/rdbms/admin/addmrpt.sql
Current Instance
~~~~~~~~~~~~~~~~
DB Id DB Name Inst Num Instance
———– ———— ——– ————
2381533563 ORCLCDB 1 ORCLCDB
Instances in this Workload Repository schema
~~~~~~~~~~~~~~~~~~~~~~~~~~~~~~~~~~~~~~~~~~~~
DB Id Inst Num DB Name Instance Host
———— ———- ——— ———- ——
2381533563 1 ORCLCDB ORCLCDB oracle-19c-v
Using 2381533563 for database Id
Using 1 for instance number
Specify the number of days of snapshots to choose from
~~~~~~~~~~~~~~~~~~~~~~~~~~~~~~~~~~~~~~~~~~~~~~~~~~~~~~
Entering the number of days (n) will result in the most recent
(n) days of snapshots being listed. Pressing <return> without
specifying a number lists all completed snapshots.
Listing the last 3 days of Completed Snapshots
Instance DB Name Snap Id Snap Started Snap Level
———— ———— ———- —————— ———-
ORCLCDB ORCLCDB 1 24 Sep 2020 12:38 1
2 24 Sep 2020 14:00 1
3 24 Sep 2020 14:25 1
4 24 Sep 2020 14:30 1
5 24 Sep 2020 14:50 1
Specify the Begin and End Snapshot Ids
~~~~~~~~~~~~~~~~~~~~~~~~~~~~~~~~~~~~~~
Enter value for begin_snap: 4
Begin Snapshot Id specified: 4
Enter value for end_snap: 5
End Snapshot Id specified: 5
Specify the Report Name
~~~~~~~~~~~~~~~~~~~~~~~
The default report file name is addmrpt_1_4_5.txt. To use this name,
press <return> to continue, otherwise enter an alternative.
Enter value for report_name: ADDM_PDB1_SEPT24.txt
Using the report name ADDM_PDB1_SEPT24.txt
Running the ADDM analysis on the specified pair of snapshots …
Generating the ADDM report for this analysis …
ADDM Report for Task ‘TASK_15’
——————————
Analysis Period
—————
AWR snapshot range from 4 to 5.
Time period starts at 24-SEP-20 02.30.46 PM
Time period ends at 24-SEP-20 02.50.05 PM
Analysis Target
—————
Database ‘ORCLCDB’ with DB ID 2381533563.
Database version 19.0.0.0.0.
ADDM performed an analysis of instance ORCLCDB, numbered 1 and hosted at
oracle-19c-vagrant.
ADDM detected that the system is a PDB.
Activity During the Analysis Period
———————————–
Total database time was 6 seconds.
The average number of active sessions was .01.
~~~~~~~~~~~~~~~~~~~~~~~~~~~~~~~~~~~~~~~~~~~~~~~~~~~~~~~~~~~~~~~~~~~~~~~~~~~~~~
~~~~~~~~~~~~~~~~~~~~~~~~~~~~~~~~~~~~~~~~~~~~~~~~~~~~~~~~~~~~~~~~~~~~~~~~~~~~~~
There are no findings to report.
~~~~~~~~~~~~~~~~~~~~~~~~~~~~~~~~~~~~~~~~~~~~~~~~~~~~~~~~~~~~~~~~~~~~~~~~~~~~~~
~~~~~~~~~~~~~~~~~~~~~~~~~~~~~~~~~~~~~~~~~~~~~~~~~~~~~~~~~~~~~~~~~~~~~~~~~~~~~~
Additional Information
———————-
Miscellaneous Information
————————-
There was no significant database activity to run the ADDM.
End of Report
Report written to ADDM_PDB1_SEPT24.txt
In Oracle Critical Patch Update (CPU) released in October 2020, Oracle has changed the advisory page ” non-exploitable vulnerabilities in each product family will be identified separately under each risk matrix, and the total vulnerability counts will no longer include non-exploitable vulnerabilities in third-party components.” according to Oracle: https://blogs.oracle.com/security/october-2020-critical-patch-update-released
So, basically Oracle will provides fixes for third party products such as Perl for example even though the vulnerabilities will not directly exploit the Oracle product…in our case here “Oracle database system”.
to update to the latest Perl build, its applicable to Oracle 18c,12cR2, and 12cR1….19c database binaries already shipped with latest Perl build that mitigates (CVE’s CVE-2018-20843 , CVE-2019-15903)
To patch Perl….download it from Oracle Support first.
Then, check the current version:
$ORACLE_HOME/perl/bin/perl -v
This is perl 5, version 22, subversion 0 (v5.22.0) built for x86_64-linux-thread-multi
Copyright 1987-2015, Larry Wall
Perl may be copied only under the terms of either the Artistic License or the
GNU General Public License, which may be found in the Perl 5 source kit.
Complete documentation for Perl, including FAQ lists, should be found on
this system using “man perl” or “perldoc perl”. If you have access to the
Internet, point your browser at http://www.perl.org/, the Perl Home Page.
Go to the directory where you have download and unzipped the patch
cd /patches/Perl_patches/18c_Patch/31225444
using OPatch utility apply the patch (you need to check that you have the latest version of Opatch utility):
$ORACLE_HOME/OPatch/opatch apply
check the Perl version again:
$ORACLE_HOME/perl/bin/perl -v
This is perl 5, version 28, subversion 2 (v5.28.2) built for x86_64-linux-thread-multi
Copyright 1987-2019, Larry Wall
Perl may be copied only under the terms of either the Artistic License or the
GNU General Public License, which may be found in the Perl 5 source kit.
Complete documentation for Perl, including FAQ lists, should be found on
this system using “man perl” or “perldoc perl”. If you have access to the
Internet, point your browser at http://www.perl.org/, the Perl Home Page.
One of the databases I have recently upgraded to Oracle 12cR2 , the export datapump was failing and never continues to finish. This was wired….the following errors were thrown in the export log file:
ORA-39374: Statistics failed to export. Failing error is
ORA-01732: data manipulation operation not legal on this view
To troubleshoot this problem:
Try taking full database export datapump with the clause “EXCLUDE=STATISTICS“
if this doesn’t fix your problem then check the parameter size of streams_pool_size it should be at least 300 MB. changing this parameter value actually fixed my problem !
In a container database environment i have faced two errors that i would like to share how i fixed them. As you know after applying the database patches on the binaries the next step is to startup the database and then run “datapatch” script.
ERROR NUMBER 1:
DBD::Oracle::st bind_param failed: ORA-01652: unable to extend temp segment by 128 in tablespace TEMP (DBD ERROR: OCILobWrite in dbd_rebind_ph_lob) [for Statement “BEGIN
INSERT INTO sys.dba_registry_sqlpatch_ru_info
(patch_id,
patch_uid,
patch_descriptor,
ru_version,
ru_build_description,
ru_build_timestamp,
patch_directory)
VALUES
(:patch_id,
:patch_uid,
:patch_descriptor,
:ru_version,
:ru_build_description,
TO_TIMESTAMP(:ru_build_timestamp, ‘YYMMDDHH24MISS’),
:patch_directory);
COMMIT;
END;” with ParamValues: :patch_descriptor=OCIXMLTypePtr=SCALAR(0x3b38118), :patch_directory=’PK………P.[{r
.l.h.&.|lgy..m.na.w)Y%Q|T5..3…9.Nn7s2.7.SsDq.’N..e…r{M.jvL:.wڍK`l.?Z-=u.|&Zdx;..vg{Z.?5rFcf.͋9i{8R.A..V..wV}..>..I~6=,; &c….ݳ<..waA…il>..y.tsp6??>WKi4.W.q…%Z.?…?.#g..&?.?s…G”…”.g”7xHm.G9A\uj.L9.
tXDqz.|.g.I4..w3′.d.249.N..”..]7.%Y.qy_.._.}w$.woi<../vUB.P..(Y…3zqF.J9j.(N+81.N.S)}…..6E+..Z TUTwZ 봣wZ TS4m.’+.g%#.Rc.4F+9!6$l.sG0.zd.”}ErJ(.1Y..EdAq.r.s.F.S A..f.P(8f..3..Q.sw.S.0QZ..k{L..|.:.0D9.B7.3.)Q……).H C..N.!…’, :patch_id=’31281355′, :patch_uid=’23688465′, :ru_build_description=’Release_Update’, :ru_build_timestamp=’200703031501′, :ru_version=’19.8.0.0.0′] at /opt/oracle/product/19c/dbhome_1/sqlpatch/sqlpatch.pm line 5538.
SOLUTION:
you need to resize the TEMP data file by increasing it in PDB$SEED database
sqlplus / as sysdba
SQL> alter session set container=PDB$SEED;
Session altered.
SQL> select FILE_NAME,TABLESPACE_NAME from dba_temp_files;
/opt/oracle/oradata/ORCLCDB/pdbseed/temp012020-05-30_19-35-09-522-PM.dbf
TEMP
SQL> alter database tempfile ‘/opt/oracle/oradata/ORCLCDB/pdbseed/temp012020-05-30_19-35-09-522-PM.dbf’ resize 55M;
Database altered.
ERROR NUMBER 2:
Datapatch error:
Validating logfiles…
DBD::Oracle::st execute failed: ORA-01732: data manipulation operation not legal on this view (DBD ERROR: error possibly near <> indicator at char 7 in ‘UPDATE <>dba_registry_sqlpatch
SET status = :p1, action_time = SYSTIMESTAMP
WHERE patch_id = :p2
AND patch_uid = :p3
AND action = UPPER(:p4)
AND action_time = (SELECT MAX(action_time)
FROM dba_registry_sqlpatch
WHERE patch_id = :p5
AND patch_uid = :p6
AND action = UPPER(:p7))’) [for Statement “UPDATE dba_registry_sqlpatch
SET status = ?, action_time = SYSTIMESTAMP
WHERE patch_id = ?
AND patch_uid = ?
AND action = UPPER(?)
AND action_time = (SELECT MAX(action_time)
FROM dba_registry_sqlpatch
WHERE patch_id = ?
SOLUTION:
sqlplus / as sysdba
ALTER SYSTEM SET “_simple_view_merging”=TRUE;
important remark: underscore parameters should’t be manipulated unless advised by Oracle support engineer so the proposed solution is a workaround so set the parameter….re-execute datapatch and then unset the parameter.
lost write occurs when an I/O subsystem acknowledges the completion of the block write even though the writers did not occur in the first place. Another situation is when a former image of the block overwrites the current block image.
The ORA-600 [3020] stuck recovery error could occur on the Standby database for several reasons including & ORA-752
IMPORTANT REMARK: Do NOT repair the Standby by restoring a backup taken from the Primary, as that will lead to corrupting the Standby also!
SQL> select originating_timestamp,detailed_location,message_level,message_text,problem_key from V$diag_alert_ext where message_level=1 and message_text like’%ORA-00600%’ order by originating_timestamp desc;
cd /var/log
ls -l message*
Dump of the controlfiles
SQL> alter session set events ‘immediate trace name controlf level xx’;
Dump of the datafile headers:
SQL> alter session set events ‘immediate trace name file_hdrs level 10’;
Dump of the redo log headers:
SQL> alter session set events ‘immediate trace name redohdr level 10’;
SQL> spool /exp/oraxx1/corrupted_file_info.txt
SQL> Select * from DBA_EXTENTS where FILE_ID=&file_number and &block_number BETWEEN BLOCK_ID and BLOCK_ID+BLOCKS-1;
SQL> spool off;
SQL> spool /exp/oraxx1/object_number.txt
SQL> Select * from DBA_OBJECTS where DATA_OBJECT_ID = &object_number;
SQL> spool off;
Once the objects have been recreated, use the following procedure to skip corrupted block on the STANDBY DB:
Temporarily disable lost write protection on the standby:
SQL> ALTER SYSTEM SET DB_LOST_WRITE_PROTECT = NONE;
Allow recovery to proceed in spite of block corruptions by running the RECOVER command with the ALLOW n CORRUPTION clause, where n is the number of allowable corrupt blocks.
SQL> alter database recover automatic standby database
allow 1 corruption;
Once the alert log indicates the blocks have been marked corrupt, restart managed recovery.
SQL> alter database recover cancel;
SQL> alter database recover managed standby database using current logfile disconnect;
Issue the following SQL statement on the standby database to convert it to a primary:
SQL> ALTER DATABASE ACTIVATE STANDBY DATABASE;
Then, immediately backup the database (ALL standby databases Linux Host Names are included in NetBackup backup policy)
Backup the database against the standby recovery catalog
Set DB_LOST_WRITE_PROTECT to TYPICAL on primary and standby databases, if your database is 18c you can utilize the new feature “shadow tablespace”
*** shadow table-space setup:
ensure that compatible parameter is set to 18.0:
SQL> show parameter compatible
NAME TYPE VALUE
———————————— ———– ——————————
compatible string 18.0.0
SQL> create bigfile tablespace SHADOW datafile ‘/orad04/oradbp02/shadow.dbf’ size 120M AUTOEXTEND ON lost write protection;
SQL> select tablespace_name from dba_tablespaces where CONTENTS=’LOST WRITE PROTECTION’;
SQL> select tablespace_name,status,bigfile,contents,logging,allocation_type,encrypted,lost_write_protect,chunk_tablespace from dba_tablespaces where tablespace_name=’SHADOW’;
// to enable LOST WRITE PROTECTION:
SQL> alter database enable lost write protection;
// to disable LOST WRITE PROTECTION:
SQL> ALTER DATABASE DISABLE LOST WRITE PROTECTION;
SQL> select * from new_lost_write_datafiles$;
NOTE: you can enable shadow lost write protection for a tablespace or a data file levels also.
In-Memory database technology is already introduced in Oracle database system, however in Oracle 19c things changed ! The feature is now free with limited size of 16 GB. You can now explore “Base-Level” feature starting with Oracle 19.8 version where JULY 2020 RU (Release Update) is applied.
The new Base Level feature supports all Database In-Memory features except for the following:
To enable In-Memory “Base-level” feature:
go to cd $ORACLE_HOME/dbs and edit your init.ora file by adding the following two parameters and “restart” your database
INMEMORY_FORCE=BASE_LEVEL
INMEMORY_SIZE=7G
SQL> create table dba.in_mem as select * from dba_objects;
Table created.
SQL> explain plan SET STATEMENT_ID=’EMO1′ for select count(*) from dba.in_mem;
SQL> SELECT * FROM TABLE(DBMS_XPLAN.DISPLAY(‘PLAN_TABLE’,’EMO1′,’ALL’));
PLAN_TABLE_OUTPUT
——————————————————————————–
Plan hash value: 3285478656
———————————————————————
| Id | Operation | Name | Rows | Cost (%CPU)| Time |
———————————————————————
| 0 | SELECT STATEMENT | | 1 | 115 (0)| 00:00:01 |
| 1 | SORT AGGREGATE | | 1 | | |
| 2 | TABLE ACCESS FULL| IN_MEM | 25010 | 115 (0)| 00:00:01 |
———————————————————————
Query Block Name / Object Alias (identified by operation id):
PLAN_TABLE_OUTPUT
——————————————————————————–
————————————————————-
1 – SEL$1
2 – SEL$1 / IN_MEM@SEL$1
Column Projection Information (identified by operation id):
———————————————————–
1 – (#keys=0) COUNT(*)[22]
2 – (rowset=1019)
21 rows selected.
*** — Now i will load the table to Memory:
SQL> ALTER TABLE dba.in_mem INMEMORY PRIORITY HIGH;
Table altered.
— to check objects uploaded in memory you can query dictionary view V$IM_SEGMENTS:
SQL> select OWNER,SEGMENT_NAME,SEGMENT_TYPE from v$IM_SEGMENTS ;
OWNER SEGMENT_NAME SEGMENT_TYPE
——————————————————————————————————————————– ——————————————————————————————————————————– ——————
dba IN_MEM TABLE
SQL> explain plan SET STATEMENT_ID=’EMO2′ for select count(*) from dba.in_mem;
SQL> SELECT * FROM TABLE(DBMS_XPLAN.DISPLAY(‘PLAN_TABLE’,’EMO2′,’ALL’));
PLAN_TABLE_OUTPUT
————————————————————————————————————————————————————————————————————————————————————————————————————
Plan hash value: 3285478656
——————————————————————————
| Id | Operation | Name | Rows | Cost (%CPU)| Time |
——————————————————————————
| 0 | SELECT STATEMENT | | 1 | 5 (0)| 00:00:01 |
| 1 | SORT AGGREGATE | | 1 | | |
| 2 | TABLE ACCESS INMEMORY FULL| IN_MEM | 25010 | 5 (0)| 00:00:01 |
——————————————————————————
Query Block Name / Object Alias (identified by operation id):
————————————————————-
1 – SEL$1
2 – SEL$1 / IN_MEM@SEL$1
Column Projection Information (identified by operation id):
———————————————————–
1 – (#keys=0) COUNT(*)[22]
2 – (rowset=1019)
21 rows selected.
as shown above the explain plan shows full scan against database table stored in-memory.
** resources/refrences:
https://blogs.oracle.com/in-memory/base-level-198-ru
https://docs.oracle.com/en/database/oracle/oracle-database/20/ftnew/database-memory-base-level.html
https://www.oracle.com/a/tech/docs/twp-oracle-database-in-memory-19c.pdf
I am sharing this blog post to cover an issue i have faced while invoking “datapatch” after rolling back a patch:
logfile: /ora/dbt01/cfgtoollogs/sqlpatch/29789911/23573028/29789911_rollback_dbt01_2020Jul16_06_56_44.log (errors)
-> Error at line 2082: script md/admin/sdottsmeta.sql
– SP2-0310: unable to open file “/ora/dbt01/product/19.3/sqlpatch/29789911/23573028/&sql_script.sql”
Patch 31281355 apply: WITH ERRORS
logfile: &full_logfile (errors)
Can’t use string (“Could not open logfile &full_log”…) as a HASH ref while “strict refs” in use at /ora/dbt01/product/19.3/sqlpatch/sqlpatch.pm line 6175, <LOGFILE> line 2177.
Please refer to MOS Note 1609718.1 and/or the invocation log
/ora/dbt01/cfgtoollogs/sqlpatch/sqlpatch_39541_2020_07_16_06_55_39/sqlpatch_invocation.log
for information on how to resolve the above errors.
Add “set define on” at the end of script $ORACLE_HOME/md/admin/prvtrdfctx.plb
This will be a short blog post about an issue i have faced the other day, i was trying to query unified audit trail view:
SQL> select * from unified_audit_trail;
ORA-55940: An error occurred during execution of ktliIngestExternData
This error is related to unified audit spill over files located in $ORACLE_BASE/audit/ORACLE_SID
so you have two options:
OPTION 1: upload them by executing:
exec DBMS_AUDIT_MGMT.LOAD_UNIFIED_AUDIT_FILES;
OPTION 12: remove the spill over files if you think this will not impact your security (use rm Linux OS command)
restart your database and try querying again unified_audit_trail
 Geodata Master